You can access this blog via Cell Phones by typing the address http://dwi-r3tno.blogspot.com/?m=1
"Want to increase traffic and visitors your web popularity fast and unlimited ...? ... Leave it to me ..., I'll do it for you FREE ...! ...click Here-1 anda here-2"

Tuesday, July 5, 2011

Change the Start Menu Mobile Be Like Computers

good afternoon, this time I will try to give tips and tricks that actually has long existed. and probably many know and try, but here I only give information for friends who do not know about this.

This is actually just a regular application, but I think unique and perfect for me.
I introduce the name of the software is SmartToolkit_1.0.0_RC07.

This application has the advantage,
a. Change the menu to be like the menu on the computer.

b. Screensaver Pictures, Analog Clock, Digital Clock, and Title

c. AutoLock without having to enter a password
d. Button Restart, Shutdown, and Hibernate

e. and can display information How much % the battery has been used, and How Much Memory that has been used.

f. besides there are also facilities ScreenCapture.

g. and probably many other facilities that I have not known.

to obtain this software, please

if so, please install on your Windows Mobile Smartphone, and see the results.
for this application I have tested the Samsung C6625 with Windows Mobile Version 6.1

Thank you, Good luck and Best Wishes.

Monday, July 4, 2011

Setting Windows Mobile As a Modem Internet

good afternoon, I want to share tips and tricks for those of you who have smarphone with Windows Mobile operating system but do not know how to set your smartphone into a modem the internet.

Initially I was also confused and ask - ask, why can not I use Mobile as a modem iternet? whereas ordinary mobile phones can?, finally I try searching on the internet and finally I get to be setting mobile internet modem.

very easy way.
1. go to Start menu> All Programs> settings> More .. > Connections> USB. Select "ActiveSync" or "Mass storage" if it is click "Done".
2. The next exit from the settings menu. Click Start> All Programs> Internet> Internet Sharing and select and click.

3. Please Change Settings on the "PC Connection" to "USB", then the "Network Connection" In accordance with the change of Opertor Internet settings you use. eg I use the operator "3" then "Network Connections" to "3 WAP".
3. if it is click "Connect" and then Plug the USB data cable that is given when you buy Mobile.
4. after you Clicking the "Connect" then "Status" will change Being "Check USB Cable Connection", make sure the usb cabel plugged in correctly.
5. if everything is correct, then the "Status" will change to "Connected".
6. then please open your web browser (Mozilla, Internet Explorer, etc.). and safe surfing in the Internet world.

for the operating system I have ujia try in windows xp, Windows 7 and Linux Mint. Everything is Walking With Good.

SmartPhone Samsung C6625 Specification

good morning, today I want to share information about Smartphone I have just bought.
not arrogant or want to show off myself, but I just want to give a little information about this smartphone, and the article is also written as the opening article that will be displayed on this blog with the title of Windows Mobile.


in Indonesia, now more crowded and the sales smarphone touchscreen Android Operating System. indeed when compared to windows mobile, android is far more interesting and looks fancy if we have it. because andoid owned large companies (Google).

but I think windows mobile is actually not too far behind for the capabilities and facilities. what else is currently no Windows Mobile 7 a new release, and according to the news an awful lot like the story in which the embedded smartphone windows mobile 7.


possible that much alone. below specifications Samsung C6625

Specifications source: www.samsung.com
 
General Network GSM (850 / 900 / 1800 / 1900 / MHz), WCDMA (850 / 900 / 1900 / 2100 MHz)
Announced 2009, 1Q
Processor
SAR Rating
Color Available
Size Dimensions (mm) 63 x 113.6 x 11.6
Weight (g) 107
Display Type TFT , 65.000 Colors
Size 2,6
Lines 0
Menu
Design Type Candybar
Antenna Fixed Internal
Keys Navigation 4-Way navigation control with Enter button
QWERTY No
Soft
Other Qwerty Keyboard
Lighting Yes
Memory Phonebook 1000
Internal (MB) 256(ROM) 128 (RAM)
Expansion Micro SD
Battery Type Li-Ion 1300 mAh
Stand-by (hrs) 300 Hour
TalkTime(min) 360 minutes
Ringtones Polyphonic
Customization Yes,Mp3, ACC
Audio Format MP3, WMA, AAC+
MP3 Player Yes
Voice AMR.WAV
FM Radio Yes
A2DP Yes
Video Format 3GP.DivX,MPEG4
Recorder Yes
TV Null
Entertainment Games Yes
Messaging SMS Yes
Total SMS
MMS Yes
EMS Yes
Email Yes, Push Mail
IM
Push-To-Talk
Connectivity HSDPA Yes, HSDPA, 7.2 Mbps
EDGE
Bluetooth Yes, v2.0 with A2DP
3G Yes
GPRS Class 10 (4+1/3+2 slots)
Infrared (IrDA) No
USB Port Yes
WIFI/WLAN
Data Cable Yes
Data Modem Yes
GPS No
Software Java (J2ME) No
WAP Yes Ver 2.0
Platform OS Windows Mobile 6.1
Browser Yes, HTML
Predictive Text Entry T9
Speech Codes Yes
PIM Application
Others Application
Personal Themes Yes
Caller ID Yes
Profile ID Yes
Camera Lens Type CMOS , 1.9 Megapixel
Digital zoom 1x
Max. Resolution
Flash Yes
Night Mode Yes
Multi Shot
Frame Types
Extra Features
Photo Format jpeg
Front Camera
 

Tuesday, June 28, 2011

Adding Category Articles on Blogspot

What is a Category Articles or Blog?
Category of the article / blog is a collection of articles that you specify to be grouped into one. You can have as many categories as you want, and as many entries in one category. You can view the article de grouped in the category of the article by clicking on the title of the article category.

for how to display the category of the article on your blog, follow these steps - the steps below:

1.Sign into Blogger.

2.Click the "Layout" link in the Dashboard box.

3.Click on "Add a Page Element" in the blog layout area.
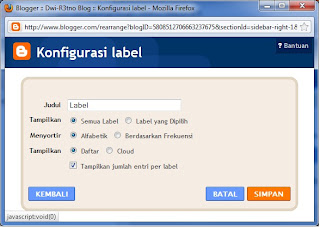
4. In the pop-up window, click on "ADD TO LABEL" After the Newsreel.


5. Click "SAVE CHANGES" to close the pop-up window.

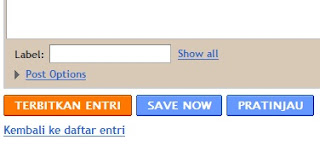
to classify the articles according to the category of the article, you must fill in the "label" at the bottom when we post a new article:
See Figure Below :


Pingbox for Yahoo Messenger on Blogspot

What's Pingbox?
Pingbox is a facility to chat between the owner of the website / blog by visitors to your blog / website using yahoo messenger account if the owner of the blog / website is online.

How to make Pingbox:
1. please visit the URL http://messenger.yahoo.com/pingbox/
2. then click Create a Pingbox

3. wait a few seconds / minutes and will appear as shown below:


4. select and change the background theme to your liking, then fill the display name
5. if it is, you can change the greeting text online and offline message to your liking.
6. then fill Pingbox save as. if it is click save.
7. when we click save, it will display a new window whose contents we have to log into your yahoo mail account.

8. if login is successful, we then go back to previous Pingbox page, as shown below:

9. click the icon bloggers if we want to incorporate into your blog Pingbox
10. The next set Pingbox size you want to insert into your blog / website.
11. if it is copy the existing code in the box "copy code and follow the instruction for blogger" by clicking the button "Copy to Clipboard".

if it is,
Instructions for Blogger
1. Copy the code to the clipboard.
2. Sign into Blogger.
3. Click the "Layout" link in the Dashboard box.
4. Click on "Add a Page Element" in the blog layout area.
5. In the pop-up window, click on "ADD TO BLOG" under the HTML / JavaScript.
6. Type in Desired "Title" Such as "Chat with Me!" or "My Pingbox".
7. Pingbox Paste the code into the "Content" area (Ctrl + V).
8. Click "SAVE CHANGES" to close the pop-up window.

Create a link "Back To Top" to Blogspot

to create a link "back to top" is very easy. You can follow the steps - the steps I provided below:

1. please prepare images to be made ​​as "back to top", you can create your own or search on google.com

2. furthermore, if you make your own, then you have to upload the first image that you created, you can upload the images to "photobucket", "ImageShack", and many others. or you are just looking for a picture through google.com and copy link to your desired image.

3.please login to your account blogspot

4.if it is successful, please click the link design or Rancangan (Indonesia)

5. then add gadged and select HTML / JavaScript.
Next 
Next

6. then enter the code below into the column content:
<a href='#' style='display:scroll;position:fixed;
bottom:0px;right:0px;' title='back to top'><img src='URL Your Picture'/>Bact to Top</a>


7. replace "Your Picture URL" into the URL address where you store or upload a picture

8. if it is click save.

Monday, June 27, 2011

How to Create Read More on Blogspot

at blogspot.com when we post new articles and content length, then the total will be displayed in the main page, this has resulted in our blog to be very long and unattractive.

but it can be overcome by adding the commands read more on each article. how:


1. please login to your account blogspot
2. if it is successful, please click the link design orRancangan (Indonesia)
3. then click Edit HTML
4. give a check list on the "expand widget templates"
5. The next look at the code below:

<data:post.body/>

6. if you have found, then delete the code and replace it with code below.
 <b:if cond='data:blog.pageType == "item"'>
<style>.fullpost{display:inline;}</style>
<p><data:post.body/></p>
<b:else/>
<style>.fullpost{display:none;}</style>
<p><data:post.body/></p>
<a expr:href='data:post.url'>Read More......</a>
</b:if>


for the words "read more ..." It can be changed to your liking.

7. if everything already, please click the save template
8. next click the settings menu and then select the formatting.
9. in the "post template" fill in the code below:

<span class="fullpost">
</span>


10. if so, please click the save button.
11. the setup is complete, we try to post a new article by clicking the post menu > New Entries.
12. post a new article box appears and there are two tabs namely the Edit HTML and Compose. just choose Edit HTML. then automatically appear code:

<span class="fullpost">
</span>

13. please write the contents of the article before <span class="fullpost"> command, and fill the article in the command <span class="fullpost"> contents of the article you </ span>

explanation:

  • if we put before the command <span class="fullpost"> then the contents of the article will appear in the main page but not all, only a portion of your article. you can see if we've all clicked links "Read More ..."
  • if we insert the contents of the article among <span class="fullpost"> contents of the article you </ span>, then the article would appear entirely after we click the "Read More ..."

14. if everything is done, then the next click the save button


"Want to increase traffic and visitors your web popularity fast and unlimited ...? ... Leave it to me ..., I'll do it for you FREE ...! ...click Here-1 anda here-2"

 
Design by Free WordPress Themes | Bloggerized by Lasantha - Premium Blogger Themes | cheap international voip calls